Intro
Recently, I have been delving into the full-stack side of Nuxt.js and seeing what it can offer in terms of building out a full-fledged API. By leveraging the serverMiddleware property, you can create REST endpoints using Express, all without leaving your project directory. That's powerful!
However, once your application begins to scale and your server and database are put under a more strenuous load, you need to ensure that your API will remain performant for your users. You don't want to be losing potential visitors/revenue if your app goes down! It's important to catch these performance regressions before it's too late!
Thankfully, there is a tool out there that lets you simulate heavy workloads and multiple concurrent user connections. Enter k6!
What's k6?
k6 is a "load testing tool and SaaS for engineering teams". It's an incredibly useful tool that lets you run load tests straight from your command line, using ES6 Javascript syntax! It comes with a CLI tool that's full of a ton of useful features, and actionable metrics that give you a 360° view of your APIs performance. To learn more about all the useful metrics k6 captures, feel free to check out their section dedicated to itThis article will walk you through the process of setting up a basic API endpoint in Nuxt using the serverMiddleware property and Express, deploying that Nuxt application to Vercel using Nuxt Vercel Builder, and finally load testing our production endpoint with k6.
If you want to jump right into the code, check out my repository on Github which mirrors what we will be implementing.
Setup
It goes without saying we'll need a fresh Nuxt application to get rolling! Go ahead and create a new Nuxt project using the command line tool of your choosing (I prefer npx).
npx create-nuxt-app <project-name>
Next, we need to make sure that we are setting our Nuxt deployment target to server since we will be making use of serverMiddleware. We'll also need to edit our nuxt.config.js to specify the directory we wish to use for API routes. Go ahead and add the following lines to your nuxt.config.js file.
export default {
  // ...
  target: 'server',
  // ...
  serverMiddleware: {
    '/api': '~/api'
  }
  // ...
}
Since we will need a server, we also need to install Express.
npm install express
Excellent! Next, make sure k6 is installed to your machine. For your platform specific installation view their section here. For Mac OSX users, simply use Homebrew.
Finally, since we will be deploying our application to Vercel, we need to make use of Nuxt Vercel Builder in order to tell Vercel how to deploy our server side rendered Nuxt application and Express API to their platform.
Create a file called vercel.json in the root of your project.
{
  "version": 2,
  "builds": [
    {
      "src": "nuxt.config.js",
      "use": "@nuxtjs/vercel-builder",
      "config": {
        "serverFiles": ["api/**"]
      }
    }
  ]
}
Creating our API endpoint
For the purposes of this demo, we will only be building a simple "ping" endpoint to load test. In a more full-featured SaaS application, you'd want to also test some CRUD operations paired with a database of your choosing to better simulate the more involved operations your users will be performing.
Go ahead and create a folder in the root of your project called api and inside a file called index.js as well as ping.js. This is where we will be initializing our express server and setting up our route.
In index.js, add the following lines.
const express = require('express')
const app = express()

const ping = require('./ping')
app.use(ping)

if (require.main === module) {
  const port = 3001
  app.listen(port, () => {
    console.log(`API server listening on port ${port}`)
  })
}

module.exports = app
And then in ping.js.
const { Router } = require('express')
const router = Router()

router.use('/ping', (req, res) => {
  res.json({
    message: 'Ping!'
  })
})

module.exports = router
Great! Now if you run npm run dev and navigate to localhost:3000/api/ping you should see our simple JSON response!
It's time to deploy!
Deployment
You will need to push your local project to a Git repository, and follow the deploy instructions on Vercel. Thankfully, our vercel.json file takes care of all the work to deploy our SSR Nuxt app here!
Once you have a publicly accessible URL for your project, navigate to your-project-url.vercel.app/api/ping to make sure our API deployed successfully.
Load testing our endpoint
Now that our SSR Nuxt application with a basic API is deployed to Vercel, it's time to load test our ping endpoint. Create a file in the root of your project called loadtest.js and add the following:
import http from 'k6/http'
import { check, group } from 'k6'
import { Trend } from 'k6/metrics'

let PingTrend = new Trend('Get ping', true)

export let options = {
  vus: 40,
  duration: '15s',
}

const baseUrl = `https://your-project-url.vercel.app/api`
const endpoints = {
  ping: `${baseUrl}/ping`,
}

export default function () {
  group('ping', function () {
    // Get ping
    let getPingRes = http.get(endpoints.ping)
    check(getPingRes, {'status was 200 (ping)': (r) => r.status == 200 })
    PingTrend.add(getPingRes.timings.duration)
  })
}
Make sure to replace the baseUrl variable with the URL for your deployed Nuxt API.
For our k6 options, we are specifying that we will run 40 concurrent virtual users with a test duration of 15 seconds. It's up to you to increase/decrease as you'd like to test expected concurrent load. As you'll see, our API can handle 40 concurrent users in parallel no problem.
In k6, a trend is a custom metric on their platform that calculates different values for your invocation like the minimum, maximum, median and average percentiles of the execution time. In our script we are creating a new trend to track our ping performance. Additionally, we are adding a check that the endpoint was successful with a 200 status code result.
Now, we can run this file from our command line using the command
k6 run loadtest.js
When your load test is finished, you should see something like this
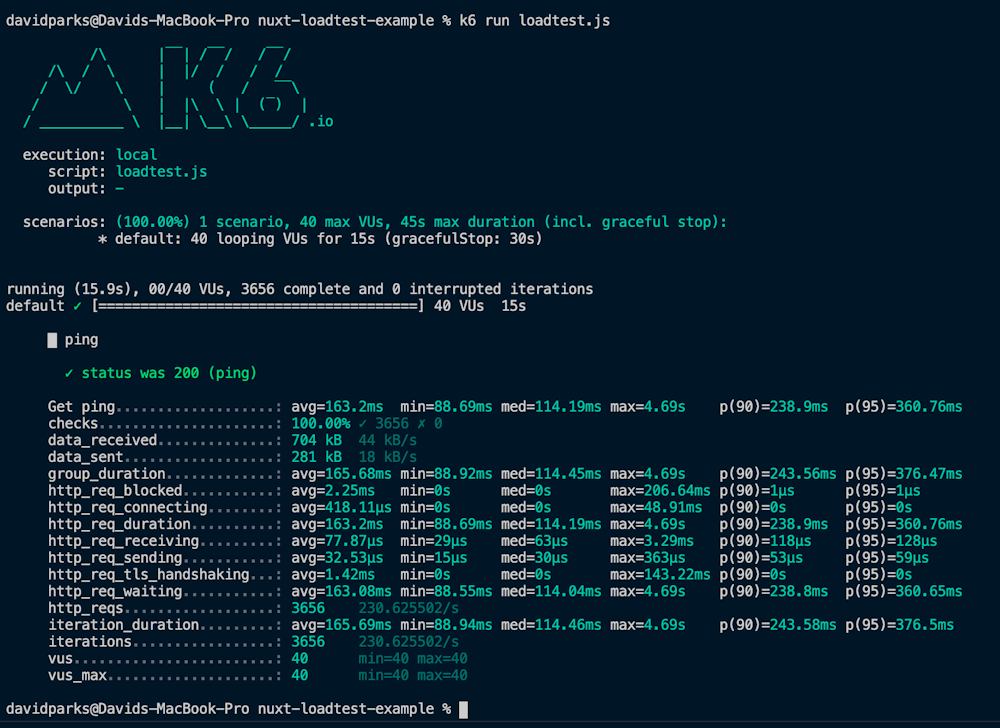
The main metric we are interested in is the first one, our Get ping line. As you can see there are average, minimum, median and maximum values for the API request execution time from request to response.
Making sense of the results
You might be saying, wow, the maximum time to execution is a whopping 4.69s and a minimum of only 88.69ms! Why is the gap that large!
Well, when deploying to a serverless environment there is a well known problem known as a cold start. Since Nuxt Vercel Builder deploys our app as a serverless function, we must first spin up our serverless function after it has not been used for some period of time. This is one of the current drawbacks serverless computing faces. There are some workarounds known as "keeping functions warm" by invoking them on regular intervals (potentially resulting in a larger usage bill depending on your deployment platform), however this blog won't delve into that. Feel free to read more on the topic.
Wrapping up
Excellent! We have successfully created a Nuxt API using Express and serverMiddleware, as well as deployed our application and API to Vercel using Nuxt Vercel Builder and tested the API under a heavy load using k6. It's up to you to extend the API and tailor the load testing script to your projects functionality and expected load, but I hope this gets you started on the right foot!
Thanks for reading, and if you found the article helpful feel free to share on Twitter below!
Enjoyed the article? Consider sharing on Twitter!
Last updated
November 1, 2022